 P4 Software
/
logisticaHQ Client Portal
P4 Software
/
logisticaHQ Client Portal
This page shows you how to find, create and change the products in your catalogue: the list, every tab and field of the product page, product images, packsizes, components and minimum / maximum levels. It is for client users who can view products, and in particular for those who manage them.
Your warehouse sets these switches for each user. If you can only view, every product page opens as read-only text. See View only and Administer access.
Master data > Products
The list shows every product of your company that is still active. At the top you find the page title Products and the line of Help text reads "Manage your product catalog. Click a row to edit an item."
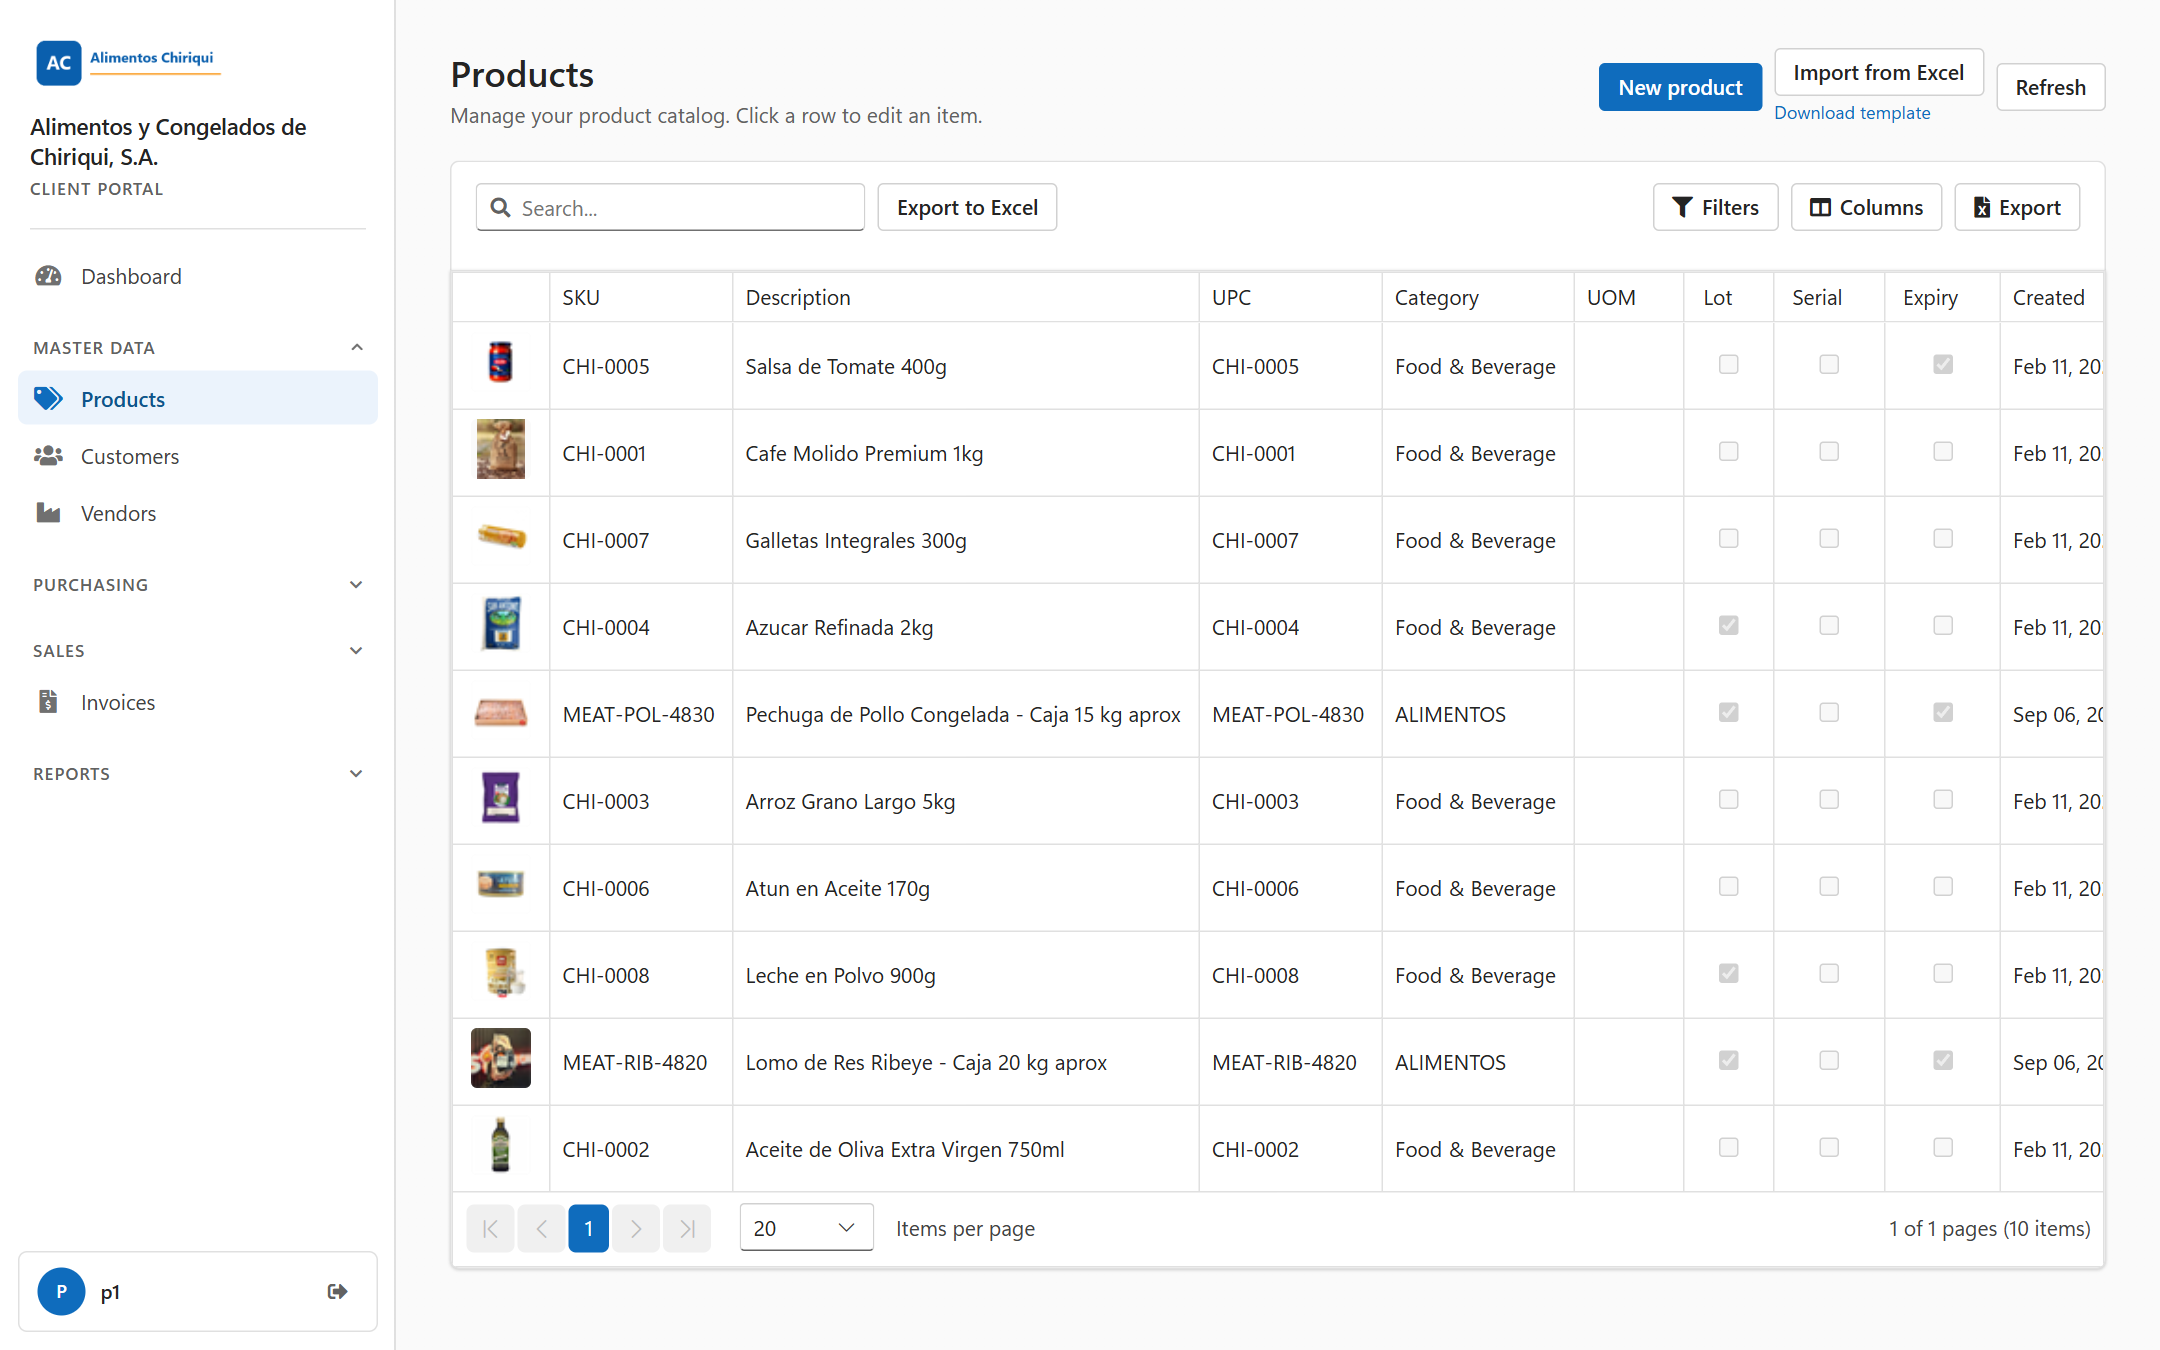
The product list for a user who can manage products.
Above the list, a row of tiles counts your products. The figures are always your own company's, and they come from the same count the warehouse sees for you. They can be up to a minute behind a change made by someone else; after you save a product, upload its image or import a file here, they are up to date when you return to this page, and Refresh brings them up to date at any time.
| Tile | What it shows |
| Catalogue | How many products you have, split into In stock (at least one stock record with a quantity above zero, in any zone) and No stock. Discontinued products are not counted. |
| Units on hand | The total units you have in the warehouse, and your categories as a bar: the three largest by name and all the others together in one grey part (for example 2 more categories). If you have exactly four categories, all four are named. Products with no category are shown as No category. |
| Traceability | How many products are tracked by Lot, Expiry and Serial, each with its share of the catalogue (% of the catalogue). |
| Needs attention | Products you can improve on the product page: Incomplete (missing something your company's product rule requires; this row only appears when such a rule exists or a product is incomplete), No photo, No category and No barcode (neither a UPC nor a barcode value). Fields only the warehouse can fill in, such as the unit cost, never make a product incomplete for you. This tile is shown to users who can manage products. |
Every figure is a button. Press it and the list below shows only those products; press the same figure again to go back. The figure you pressed is highlighted with a tint, a ring and a check mark. Figures from different tiles work together: for example, press In stock and then Lot to see the lot-controlled products you have stock of. Two figures of the same group replace each other (In stock and No stock).
While at least one figure narrows the list, a line such as 2 filters applied appears under the tiles with Show all products, which lets every figure go at once. The figures stay as they are while you filter: they count your whole catalogue, not only the rows on screen. If a number cannot be shown it appears as a dash (-) and that figure cannot be pressed.
On a phone the tiles sit in one row that you swipe sideways.
| Button | What it does | Who sees it |
| New product | Opens an empty product page so you can create a product. | Manage products |
| Import from Excel | Opens the page where you upload a spreadsheet to create or update many products at once. See the section Import products from Excel below and Importing and exporting with Excel. | Manage products |
| Download template (small link next to Import from Excel) | Downloads the product import template: an Excel workbook in your language with the Products sheet to fill in, an Example sheet and a Read me sheet with the instructions. | Manage products |
| Refresh | Reloads the list and the figures above it. | Everyone |
Above the grid you find a search box (Search...) and the buttons Filters (shows a filter row under the column headings), Columns (choose which columns are shown), Export and Export to Excel. When a filter is on, a Clear filters button with the number of active filters appears. Your column and filter choices are remembered for next time. The difference between Export and Export to Excel is explained in Importing and exporting with Excel.
| Column | What it shows |
| (no heading) | A small picture of the product, or a picture icon when the product has no image. |
| SKU | Your unique code for the product. |
| Description | The product name. |
| UPC | The retail barcode number. |
| Category | Your own grouping of products. |
| UOM | The unit of measure of the product. |
| Lot | A tick when the product is lot controlled. |
| Serial | A tick when the product is serial controlled. |
| Expiry | A tick when the product is expiry controlled. |
| Created | The date the product was created, for example Jan 05, 2026. |
You can sort and filter every column except the picture.
Click once on a row, or move to it and press Enter, to open the product page. You do not need to double-click.
The page shows the toast Product created. and opens the new product. The image panel, the Inventory tab and the stock figures appear only for a saved product, so add the image after this step. Click Cancel if you do not want to create the product.
The import creates or updates many products at once, instead of one by one. It needs Manage products. Nothing is saved until you have seen what the file would do and confirmed it.
On the product list, Import from Excel and Download template sit side by side. Click Download template: your browser saves the workbook products-import-template.xlsx. The same Download template link is on the Import products page too.
The template comes in your language: the column names, the sheet names, the example and the instructions follow the language you use in the portal. It has three sheets:
| Sheet | What it is for |
| Products | The sheet you fill in. Row 1 holds the 30 column names; your products start in row 2. It is the only sheet the import reads. |
| Example | One product on three rows (a case of 12, an inner pack of 6 and the single unit), so you can see how the rows are filled in. It uses the measurement units your warehouse allows for your products (with the measures written in those units), fills in the required fields the template has a column for, and leaves Client empty. It is never imported. |
| Read me | The instructions, ending with a table of the values allowed in each column that chooses from a list. It is never imported. |
The 30 columns are the product fields you could always set from the portal, plus pack sizes, hazardous material and freight data. They come in this order:
| Column | What to enter |
| Sku (required) | Your unique product code. It decides whether the row creates a new product or updates the one you already have. |
| Upc | The retail barcode number. |
| BarcodeValue | The barcode the warehouse scanners should match for the product. |
| BarcodeType | The format of that barcode: Code128, EAN13, UPCA or ITF14. |
| Category | Your own grouping of products. |
| Description | The product name. On a pack size row it describes that pack. |
| Bill of material controlled | Y only for a product that already is a bill of material. The import never creates one and never changes its components. |
| Decimal controlled | Y or N. Y means the product is counted in fractions of a unit. |
| Decimal UoM | The unit a decimal controlled product is counted in (for example Kg). Required for a decimal controlled product, and only for those. Leave it empty for every other product: it is counted in single units, which the product list shows as Ea in the UOM column. |
| Serial controlled, Lot controlled, Expiry controlled | Y or N. |
| Packsize controlled | Y or N. A product with pack size rows needs Y. |
| Packsize name | What the pack is called, for example Case. |
| Packsize barcode, Packsize type | The barcode printed on the pack and its format (the same list as BarcodeType). |
| Eaches | How many single units the pack holds. A pack of 12 is 12. |
| Width, Height, Length | Numbers, measured on the product or pack as it is stored. |
| Length UoM | The unit of the three measures: M, Cm, Mm, In or Ft. Your warehouse may allow only some of them for your products; the Read me sheet then lists only those. |
| Weight | The shipping weight of the product or pack, as a number. |
| Weight UoM | The unit of the weight: Kg, Gr, Lb or Oz. As with the length unit, your warehouse may allow only some of them. |
| Client | Leave it empty. Every product in the file is imported for your own company. |
| Hazmat | Y or N: whether the product is a hazardous material. |
| Nmfc | The freight classification code from your carrier's tariff. |
| Freight class | The class your carrier bills the product at, written as the number only (for example 70 or 77.5). |
| Commodity | A plain-language description of the goods for customs paperwork. |
| CountryOfOrigin, HtsCode | Where the product was made, and its customs tariff code. |
The Y or N columns also accept Yes, No, True, False, 1 or 0. A value that cannot be read refuses that product.
A file made with the older, shorter product layout still imports.
When the import finishes you see what was saved, for example Import complete: 3 products created and 1 updated. and, when the file had pack size rows, Pack sizes: 2 created and 1 updated. Click Back to products to return to the list, and Refresh if you do not see the changes.
| What you see | What it means |
| Rows in the file: 12 | How many rows of your Products sheet the import found. |
| 2 products to create, 1 product to update | How many products are new (their SKU is not in your catalogue yet) and how many already exist and would change. |
| 1 product that will be refused | How many products the import will not accept. It is shown in red when it is not zero. |
| 3 pack sizes to create, 0 pack sizes to update, 1 pack size row that will be refused | The same three figures for pack sizes. They appear only when the file has pack size rows. |
| Rows that will not be imported | A list of the refused rows. Each line starts with the row number as you see it in Excel and the SKU, for example Row 4 · SKU-1, followed by the reason. The other rows still import. |
| Notes on rows that will be imported | Remarks about rows that are accepted, for example two rows that describe the same pack size. No action is needed. |
| These columns were not recognised and will be ignored: {0} | Columns whose name the import does not know. |
| These columns are not imported from the client portal and will be ignored: {0} | Columns the import knows but that only your warehouse can set, for example the unit cost. They are left out; the rest of the file imports. |
| These sheets are not imported and will be ignored: {0} | Sheets other than Products, such as Example and Read me. |
| Nothing would be created or updated, so there is nothing to import. | No row can be accepted. The import button is not available; correct the file and choose it again. |
A refused row is not imported and the preview says why. The reasons you meet most often are:
Some problems refuse the whole file instead of single rows:
| Message | What to do |
| The workbook has no Products sheet. Download the template, fill in its Products sheet and import it again. | Fill in the sheet called Products of the template. |
| This file is not the product import template. Download the template, fill in your products under its column names and import it again. | Use the downloaded template, or a file with the same column names. |
| A message that says the sheet has the columns of the product import template but is not named Products | Rename the sheet to Products and import again. |
| Import failed: {0} | The file was refused; {0} says why. |
| Nothing was imported. Check the file and try again. | The data changed after the preview and nothing could be saved. Choose the file again and read the new preview. |
At the top you see the word Product and below it the SKU as the page title (or New product for a new one). The buttons are:
After you save a change, a small Saved indicator appears next to the title.
For a saved product, a row of figures shows the stock the warehouse holds for you:
| Figure | What it means |
| On hand | Total quantity in the warehouse. |
| Available | Quantity that is not allocated to an order. |
| Allocated | Quantity reserved for orders. |
| Warehouses | How many warehouses hold this product. |
| Locations | How many bin locations hold this product. |
| Tab | When it appears |
| Details | Always. |
| Packsizes | Only when Packsize controlled is Yes. |
| Components | Only when Bill of material is Yes. |
| Min / Max | Always. |
| Inventory | Only for a saved product. |
If you turn off the switch behind the tab you are on, the page goes back to Details.
If you can edit, there is a grey line of Help text under each field. A view-only user does not see it, because there are no boxes to fill in. Required fields are marked with a red asterisk. A missing required field is reported by one red message at the top of the page when you press the save button, not next to the field.
The Details tab has four sections that you can open and close: Identification, Attributes, Dimensions & weight and Freight details. The image panel sits on the right.
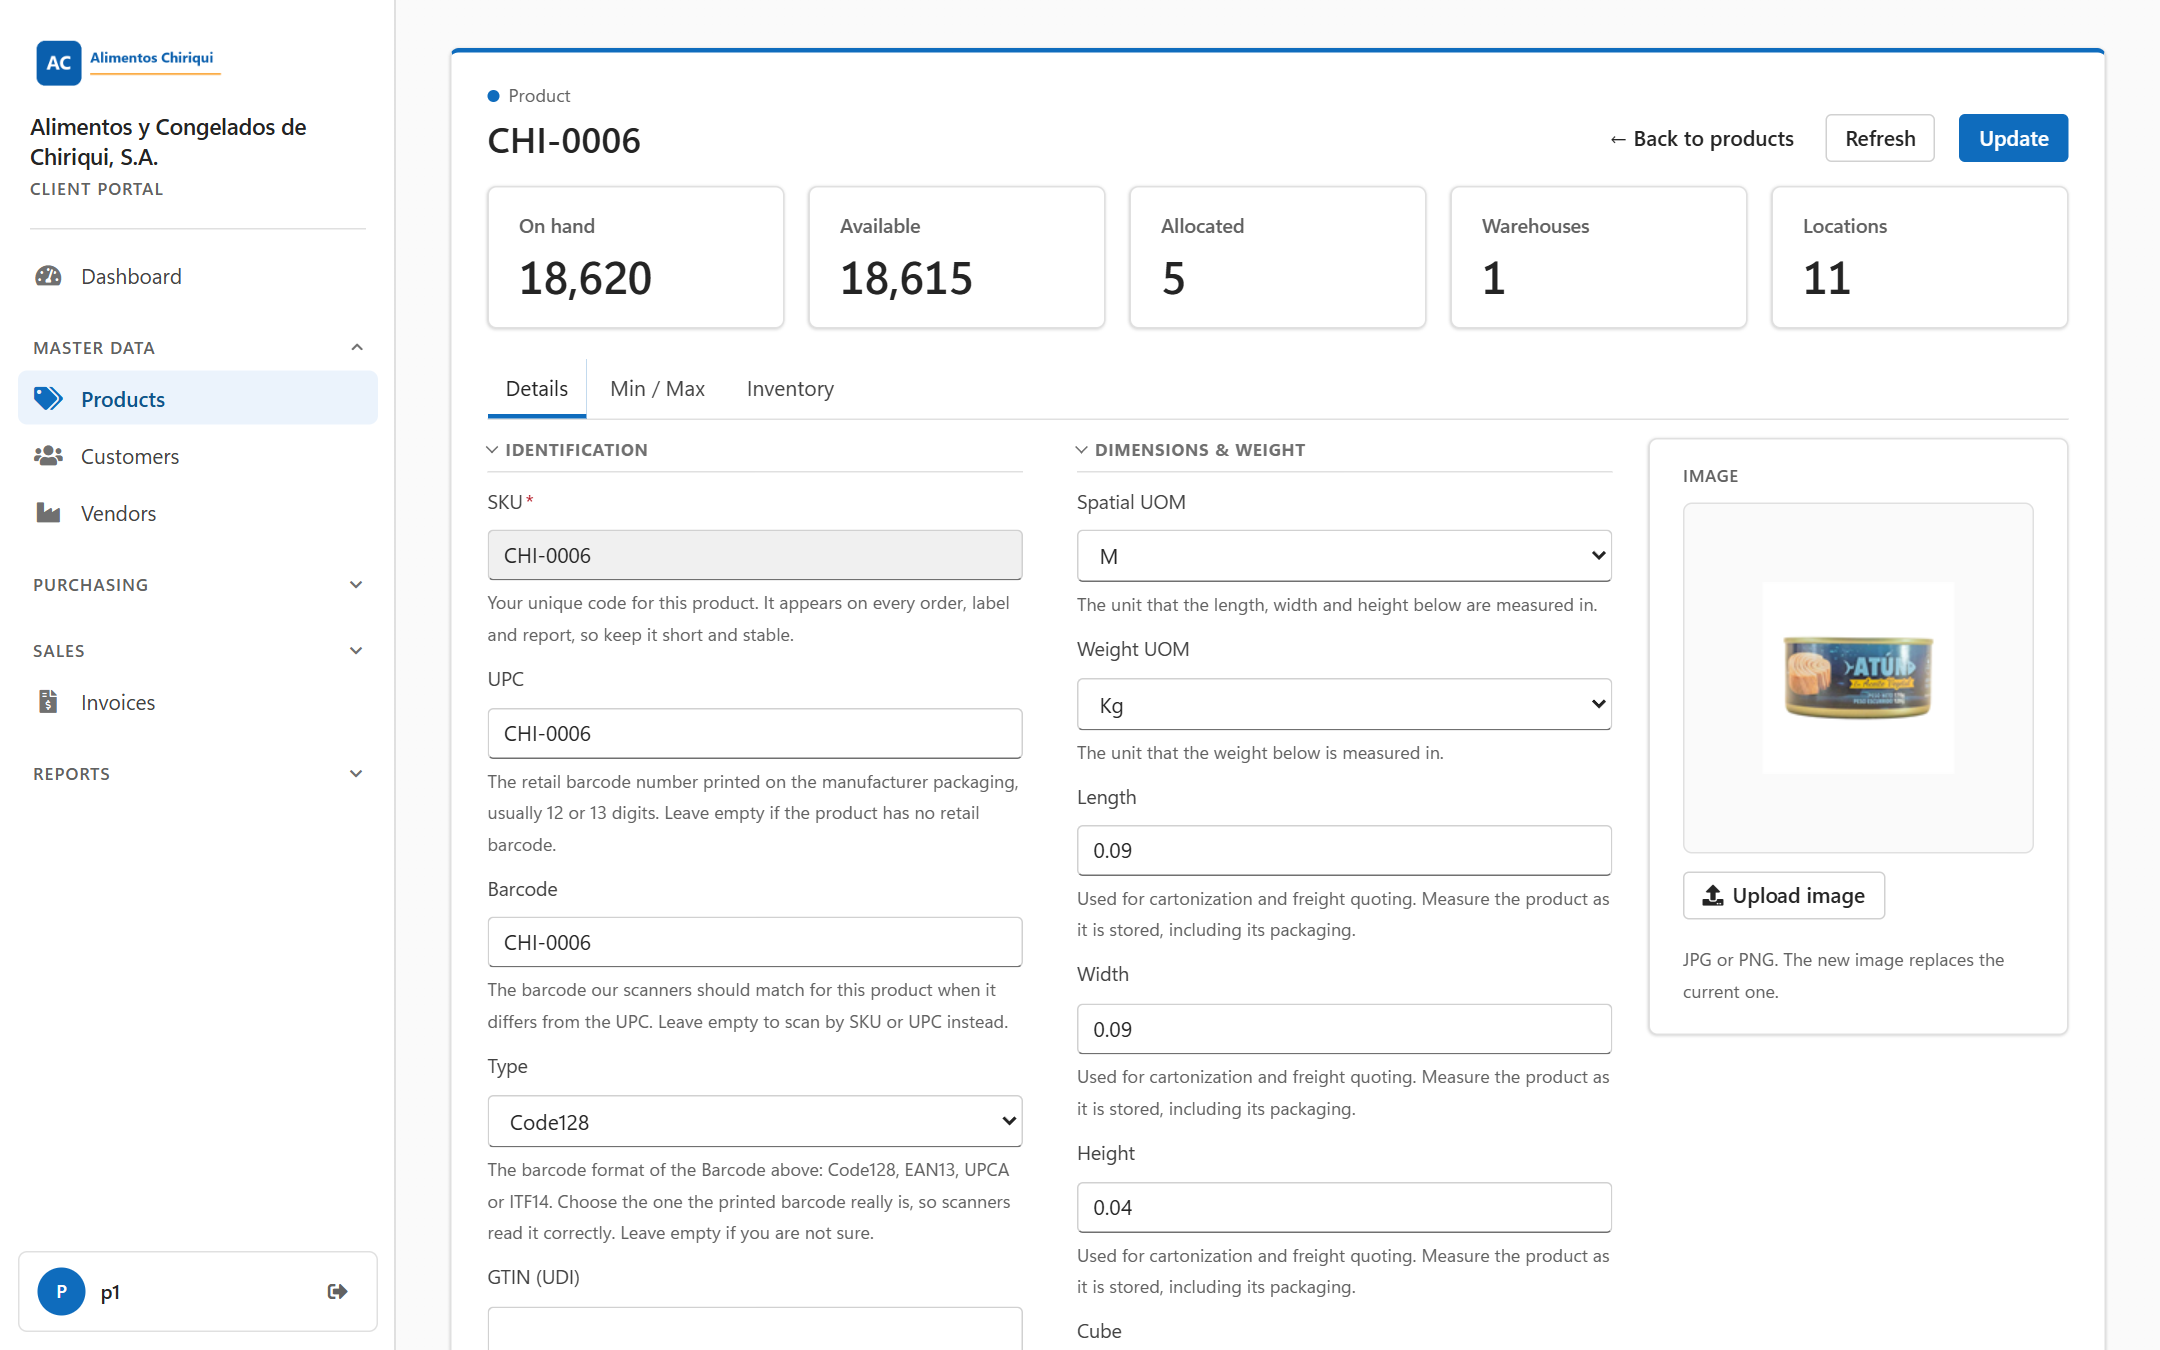
The Details tab of a saved product.
| Field | What to enter |
| SKU (required) | Your unique code for the product. It appears on every order, label and report, so keep it short and stable. After the product is saved the SKU can no longer be edited here. |
| UPC | The retail barcode number printed on the manufacturer's packaging, usually 12 or 13 digits. Leave it empty if the product has no retail barcode. |
| Barcode | The barcode the warehouse scanners should match for this product when it differs from the UPC. Leave it empty to scan by SKU or UPC. |
| Type | The barcode format of the product's barcode. Choose one of Code128, EAN13, UPCA or ITF14, or -- for none. |
| GTIN (UDI) | Only for products that carry a GTIN composite barcode or QR code, such as GS1 or HIBC medical device labels. Leave it empty otherwise. |
| Standard | The barcode standard that the GTIN follows: Plain, Gs1 or Hibc. Leave it empty unless you filled in GTIN (UDI). |
| Category | Your own grouping, used for reports and filtering. Free text, optional. |
| Subcategory | A finer grouping inside the category. Free text, optional. |
| Client | Shown only when your warehouse has named the account the product belongs to. It is display only. |
| Description | The name that staff and your Customers see on picking documents, packing slips and Invoices. Be specific enough to tell similar products apart. Several lines are allowed. |
Attributes are Yes / No switches. All of them start at No on a new product. They tell the warehouse how the product is received, stored and picked.
| Switch | What it means | When it is shown |
| Bill of material | The product is assembled from other products. You list them on the Components tab. | Not for decimal controlled products. |
| Lot controlled | The warehouse captures a lot code when it receives and picks this product. | Always. |
| Serial controlled | The warehouse captures a serial number for every single unit. | Not for decimal or packsize controlled products. |
| Expiry controlled | The warehouse captures an expiry date. | Always. |
| Manufacture date controlled | The warehouse captures a manufacture date. | Always. |
| Decimal controlled | The product is counted in fractions of a unit, for example 2.5 kg. | Not for packsize controlled, serial controlled or bill of material products. |
| Packsize controlled | The product is also handled in packs such as cases or pallets. Turning it on adds the Packsizes tab. | Not for decimal or serial controlled products. |
Some options only appear after another one is chosen:
| Field | Appears when | What to enter |
| Lot pattern | Lot controlled is Yes | An optional format that lot codes must follow when received, for example two letters followed by six digits. Leave it empty to accept any lot code. |
| Serial pattern | Serial controlled is Yes | An optional format that serial numbers must follow when received. Leave it empty to accept any serial number. |
| Inbound allowance | Expiry controlled is Yes | A number of days: the least shelf life that arriving stock must still have to be accepted at receiving. Deliveries that expire sooner are flagged. |
| Outbound allowance | Expiry controlled is Yes | A number of days: the least shelf life that stock must still have to be picked for a customer. Stock that expires sooner is held back. |
| Units of measure | Decimal controlled is Yes | The unit in which the product is counted: Kg, Gr, Lb, Oz, L, Ml, M, Cm, Mm, In or Ft. |
Combinations that cannot work are not offered: a product cannot be both serial controlled and packsize controlled (a serial number identifies one unit, a packsize holds several), and a decimal controlled product cannot also be serial controlled, packsize controlled or a bill of material, because those are counted in whole units. If you switch one on, the switches that no longer fit disappear.
Attributes are locked once the product has stock
When a saved product has stock on hand or allocated, the attribute switches and their options are locked: Bill of material, Lot controlled, Serial controlled, Expiry controlled, Manufacture date controlled, Decimal controlled, Packsize controlled, Lot pattern, Serial pattern, Inbound allowance, Outbound allowance and Units of measure. A yellow note with a lock icon appears at the top of the section:
These attributes are fixed because this product has stock on hand. They describe how existing stock was received, so changing them now would leave that stock described by rules it was never counted under.
While the stock figures are still loading the attributes are also locked. A new product is never locked. Everything else on the product, such as the SKU, description, category, barcodes, dimensions and freight details, stays editable. The same rule applies when you import products from Excel, for the columns the import can set (lot, serial, expiry, decimal and packsize control and the unit of measure). A row that would change one of them on a product that holds stock is refused: the import preview lists it under Rows that will not be imported with the reason, and the other rows still import (see Import products from Excel above). A blank cell keeps what is stored, so it never counts as a change.
If a save would change a locked attribute, the save is refused with a plain sentence that names the setting and the stock, for example "Cannot change [Lot controlled] on [SKU-1] because it has stock: [10] on hand and [0] allocated. These settings describe how that stock was received. Move or consume the stock first, then change the setting."
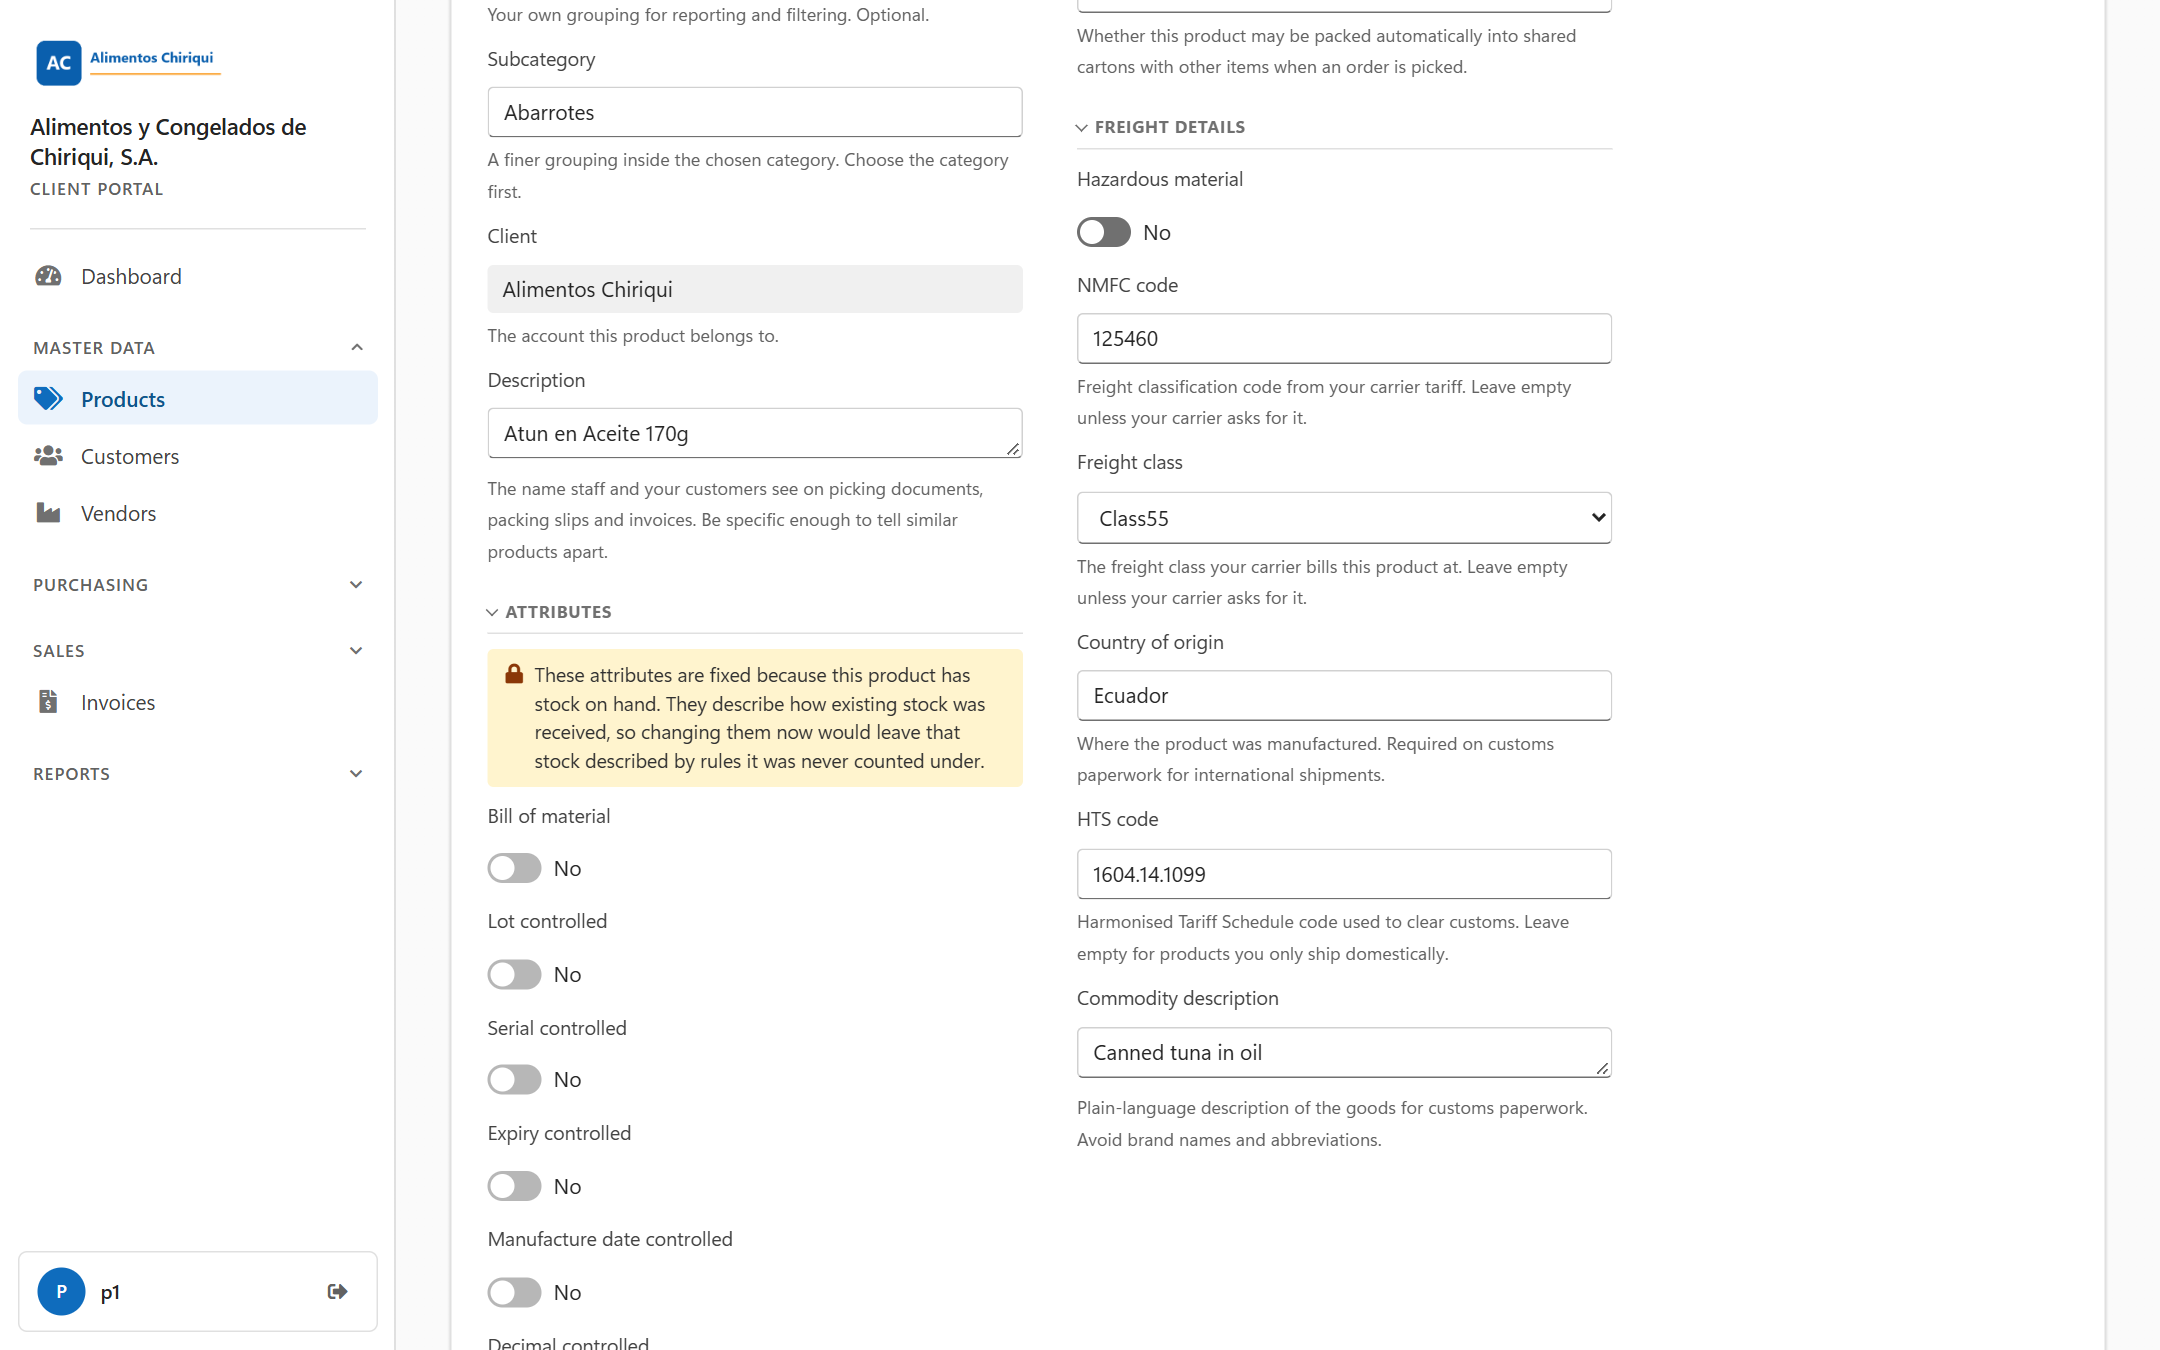
Attributes of a product that has stock.
This section is hidden for decimal controlled products.
| Field | What to enter |
| Spatial UOM | The unit for length, width and height: M, Cm, Mm, In or Ft. |
| Weight UOM | The unit for the weight: Kg, Gr, Lb or Oz. |
| Length, Width, Height | Numbers, with up to four decimals. Measure the product as it is stored, including its packaging. They are used for packing into cartons and for freight quotes. |
| Cube | Calculated for you as length times width times height. It stays blank until all three are filled in. There is nothing to enter. |
| Weight | The shipping weight of one unit including its packaging. |
| Cartonization | Whether the product may be packed automatically into shared cartons with other items when an order is picked: Inherit (the default), Pre Boxed, Single Sku or Multi Sku. |
| Field | What to enter |
| Hazardous material | Yes or No. |
| NMFC code | The freight classification code from your carrier's tariff. Leave it empty unless your carrier asks for it. |
| Freight class | The class your carrier bills the product at, chosen from a list (Class 50 up to Class 500). Leave it empty unless your carrier asks for it. |
| Country of origin | Where the product was made. Customs paperwork for international shipments needs it. |
| HTS code | The Harmonised Tariff Schedule code used to clear customs. Leave it empty for products you only ship domestically. |
| Commodity description | A plain-language description of the goods for customs paperwork. Avoid brand names and abbreviations. |
Some product values are not shown in the portal (for example reference numbers and substitute groups that your warehouse maintains). Saving in the portal never erases them.
The panel on the right of the Details tab is headed Image.
The Upload image button is shown only to users with Manage products.
A packsize is a way the product is packed, such as a case of 12 or a pallet of 240. The tab appears when Packsize controlled is Yes. Each pack is a collapsible section titled with its name and its number of units, for example Case (x12); a pack you have not named yet is titled New packsize.
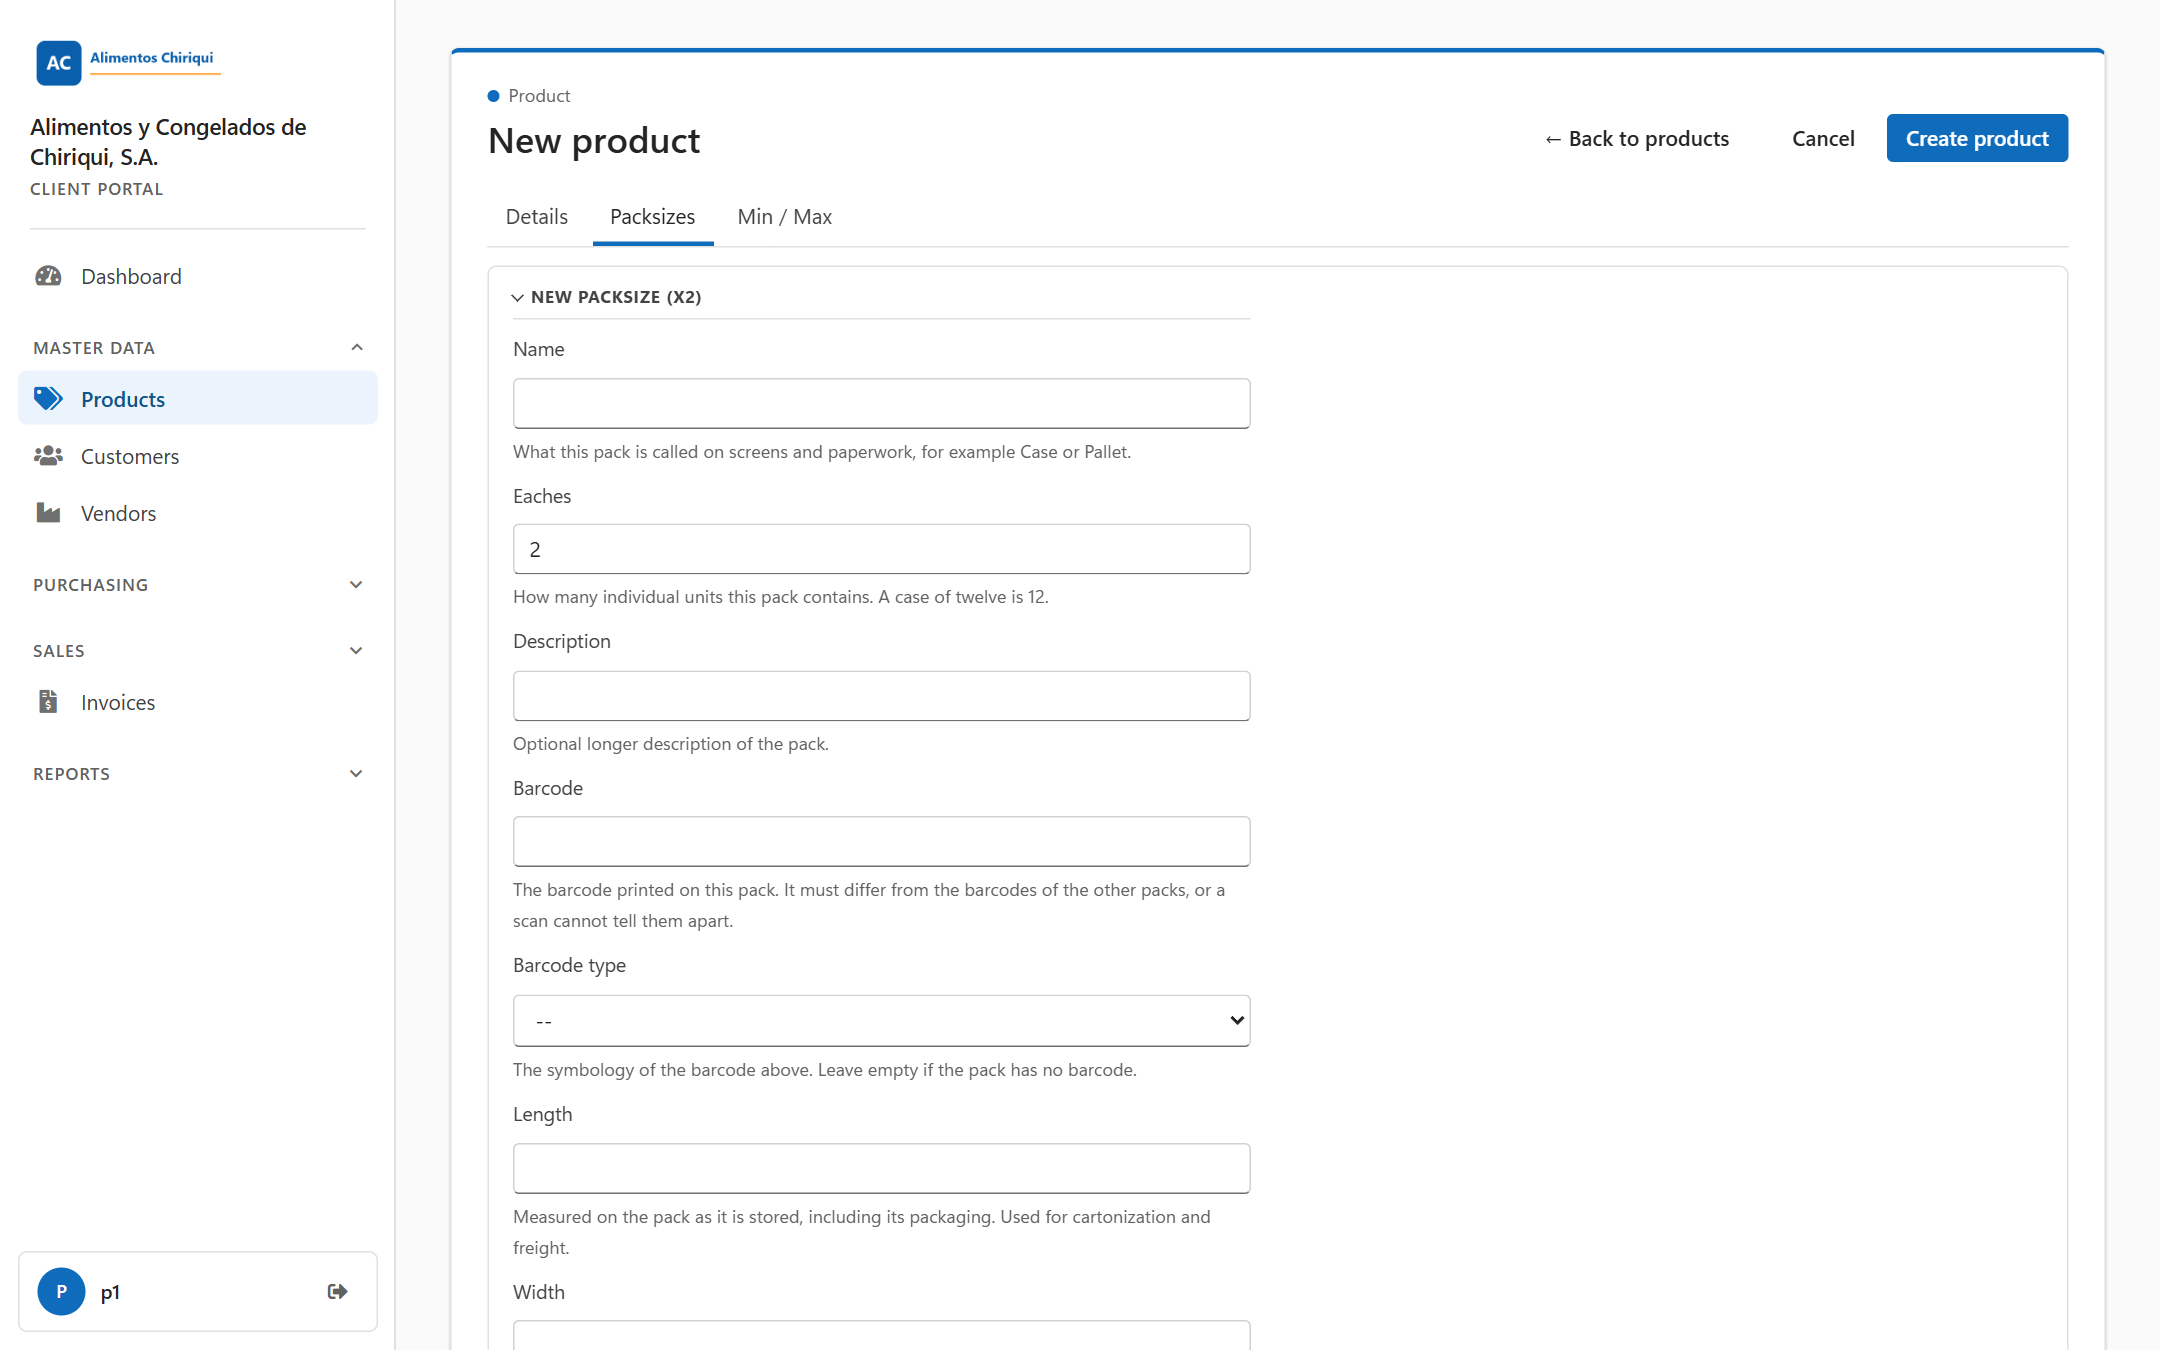
The Packsizes tab with a new pack being filled in.
The each pack. The pack of one unit is created and kept up to date automatically from the product itself (its UPC, barcode type, dimensions, weight and description). It is collapsed, locked and marked with the note The each packsize is maintained automatically from the product itself, so its details are not edited here. It appears when you save the product with Packsize controlled on.
For every other pack you can fill in:
| Field | What to enter |
| Name | What the pack is called on screens and paperwork, for example Case or Pallet. |
| Eaches | How many individual units the pack contains; a case of twelve is 12. A new pack starts at 2. The number must be at least one. |
| Description | An optional longer description of the pack. |
| Barcode | The barcode printed on this pack. It should differ from the barcodes of the other packs, or a scan cannot tell them apart. |
| Barcode type | The format of that barcode, from the same list as Type on the product. Leave it empty if the pack has no barcode. |
| Length, Width, Height | Measured on the pack as it is stored, including its packaging. Used for packing and freight. |
| Weight | The shipping weight of the whole pack including its packaging. |
| Cartonization | Whether this pack may be packed automatically into shared cartons. Inherit follows the product setting. The other choices are Pre Boxed, Single Sku and Multi Sku. |
| Reference number | Your own reference for the pack, such as a supplier pack code. The warehouse does not act on it. |
| Reference 1, Reference 2, Reference 3 | Free text for your own use. The warehouse does not act on it. |
The tab appears when Bill of material is Yes. It lists the products that make up this product. The heading is Bill of material. Until you add a line it says No components yet.
Lines with no product chosen are dropped when you save. An empty quantity is saved as 0.
This tab sets a minimum and a maximum level for each warehouse. The heading is Min / Max, and there is one row for every warehouse of your account, with the columns Warehouse, Min and Max. A blank box means no limit. If your account has no warehouses it says No warehouses. When you save, a row where you have cleared both boxes is removed.
The Inventory tab is read-only. It lists where the product is stored right now, ten rows to a page, with the highest Available first. Use Refresh to reload it.
| Column | What it shows |
| LPN | The license plate (pallet or container id) holding the stock. |
| Bin | The bin location. |
| Zone | The warehouse zone of the bin. |
| Warehouse | The warehouse. |
| Available | Quantity not allocated to an order. |
| Allocated | Quantity reserved for orders. |
| Total | The total quantity held in that location. |
With no stock it says No on-hand stock for this product. For more detail on stock, see Inventory.
Without Manage products the product page shows every value as plain text. There is no input box, drop-down, switch or text area anywhere on the page, not even a greyed-out one. The blue note at the top says You have view-only access to this section. Contact your warehouse provider if you need to make changes. There are no Update, Create product, Cancel, Add, Remove or Upload image buttons; the picture itself is still shown. You can still look at every tab, use Refresh and export.
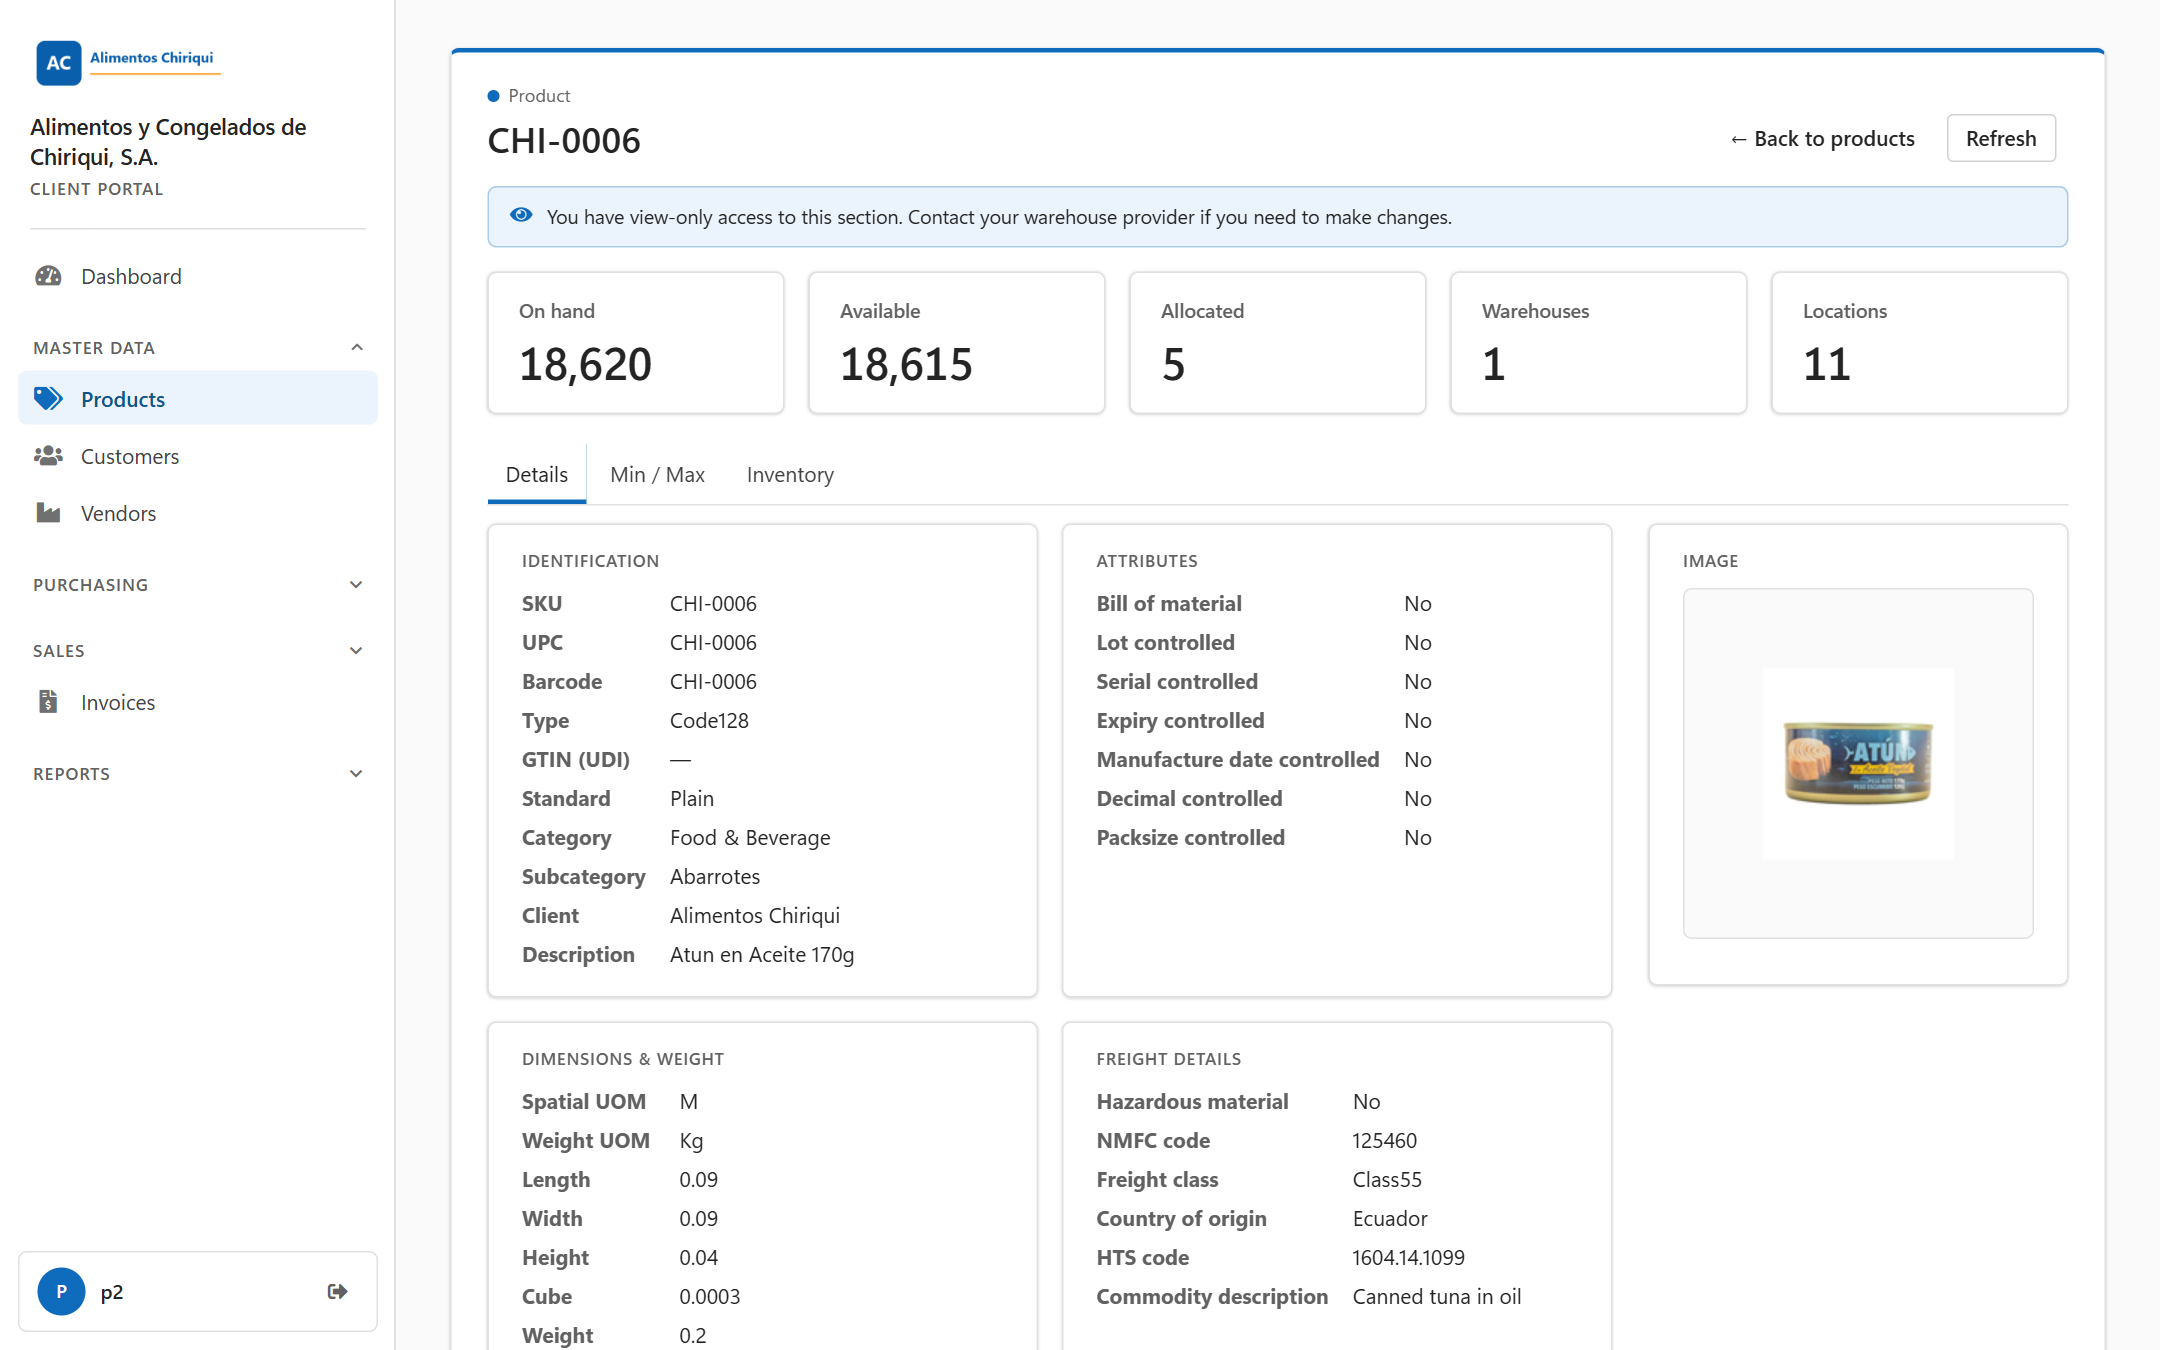
A product page for a view-only user.
| Message | What it means | What to do |
| SKU is required. | You pressed the save button with an empty SKU. | Type a SKU and save again. |
| Could not save the product: {0} | The warehouse refused the save. {0} is its reason, for example that a locked attribute cannot change while the product has stock. | Read the reason, correct it and save again. |
| Product saved. / Product created. | The save worked. | Nothing. |
| That product could not be found. | The product does not exist or is not yours. | Go back to the list. |
| This product has been discontinued. | The product is discontinued. | Ask your warehouse if you need it active again. |
| Invalid packsize. Eaches must be greater or equal to one. | A pack has fewer than one unit. | Enter a number of eaches that is at least one. |
| Image uploaded. | The image was stored. | Nothing. |
| You don't have access to this section. | Your user has no access to products. | Ask your warehouse. |
Was this page helpful?