 P4 Software
/
logisticaHQ-en
P4 Software
/
logisticaHQ-en
Everyone who works in LogisticaHQ, in the office or on the Warehouse floor, signs in with their own user. A user decides what a person can see and do (their permission level and module), which client's stock they work with, which Zones they may handle, which Printers print their labels, how their Handheld scans, and their language, time zone and first screen. This page covers the user list, creating users, and every field, tab and rule on a user's screen.
| Permission level | Who it is for |
| Administrator | People who run the System. They see the full menu and every screen, whatever module they have, and can change settings, users and permissions. An administrator cannot be tied to a client and cannot be deactivated while still an administrator. |
| User | Office and floor staff. What they see and may use is set by their module. See Modules and permission profiles. |
| PortalUser | People from a 3PL client who use the client portal to see their own stock, orders and Invoices. They are tied to one client. See Clients. |
| FieldUser | People who use the LogisticaHQ Field phone app for surgical Trays. They take no license seat and can only use the Field app. |
Your license sets how many users can be signed in at the same time. See Tenant. Each person can be signed in on one device at a time: signing in somewhere else ends their other session. See User sessions.
Open Setup > System > Users. The list shows every user with their module, group, client, name, role and time zone.
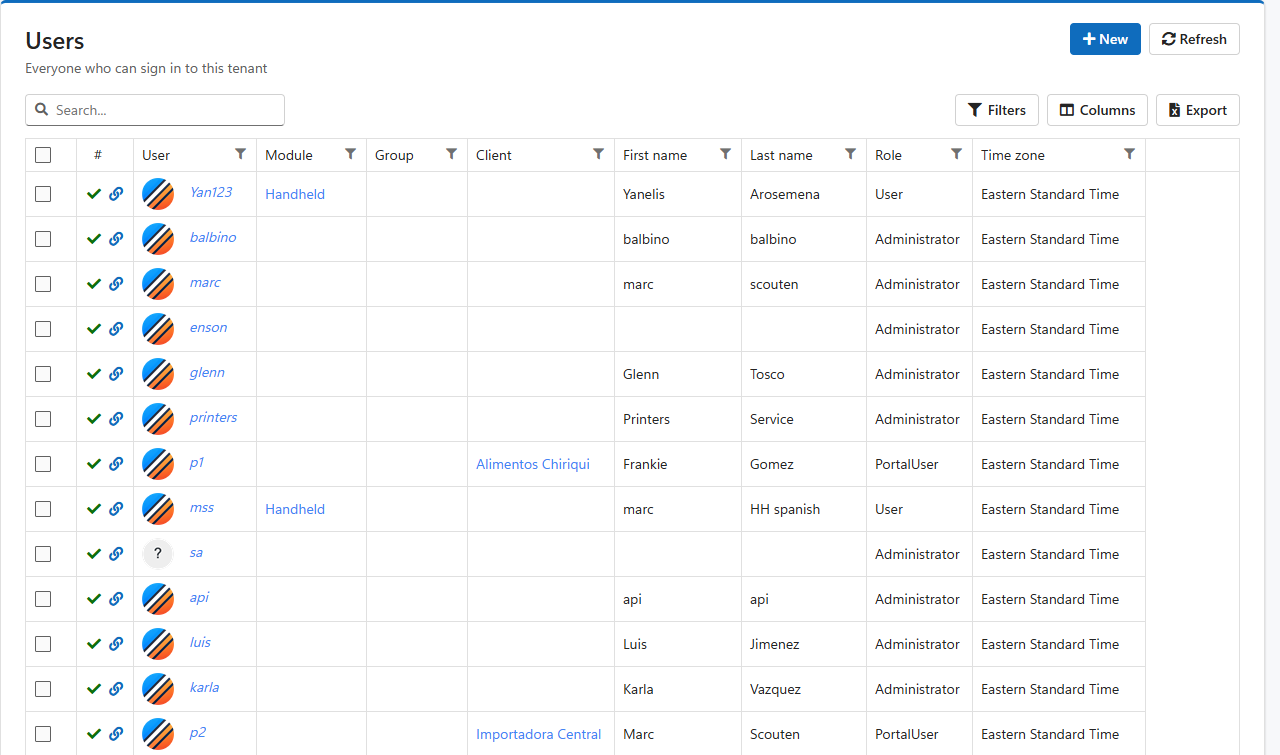
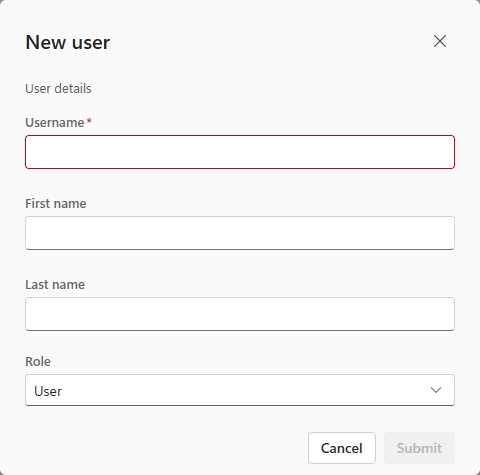
The user screen has a header at the top and, for an administrator, five tabs below it: Account, Access, Printers, Handheld and Integration. The screen opens on the Account tab.
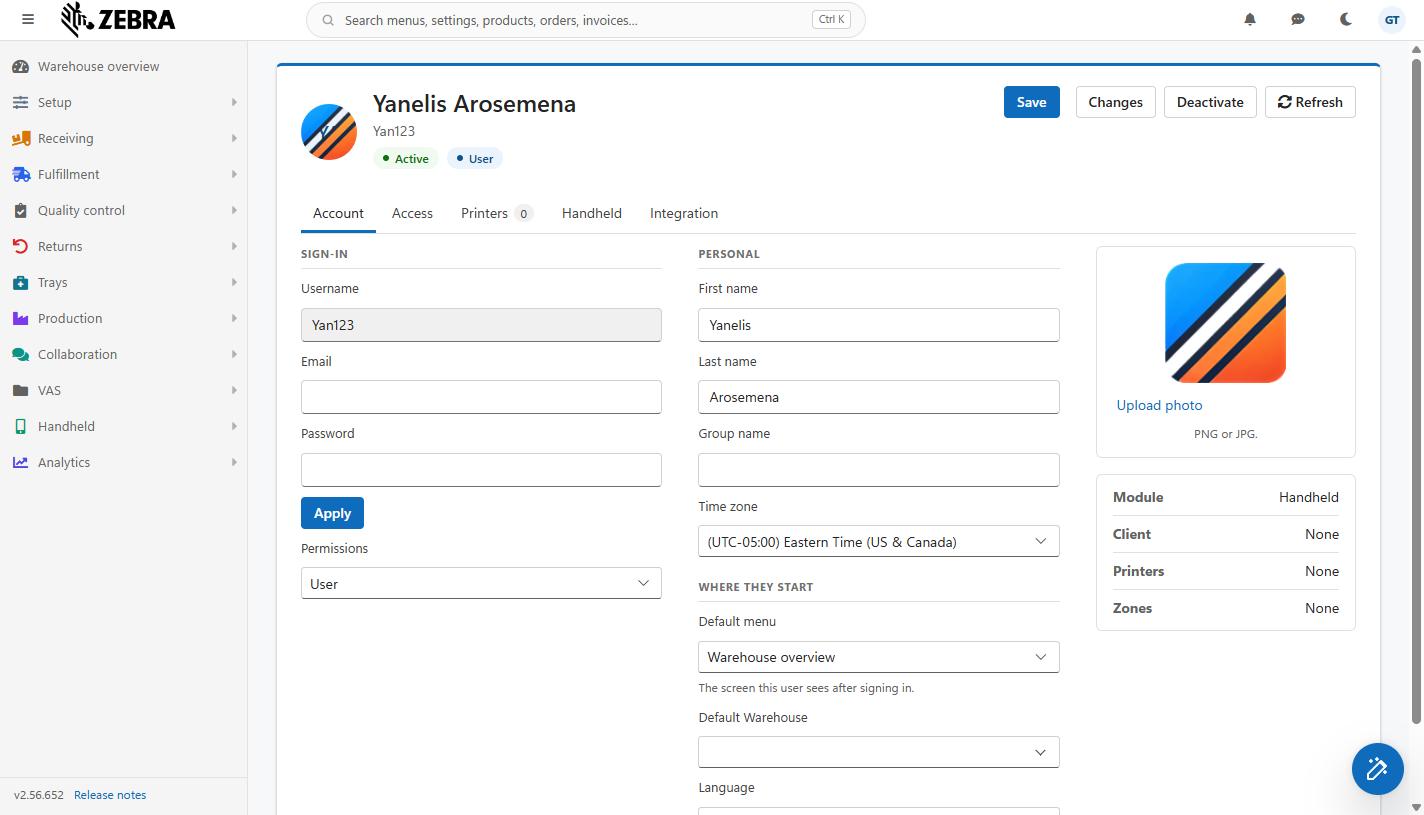
The user screen as an administrator sees it: the header with photo, name and sign-in, the Active and permission pills, the Save, Changes, Deactivate and Refresh buttons, and the five tabs with Account open.
The user screen saves in two ways. It is worth knowing which, so nothing you type is lost:
| Item | What it shows or does |
| Photo | The person's photo. When no photo has been uploaded, their initials (first letter of the first name and of the last name) show in a circle instead. Upload a photo on the Account tab. |
| Name | First name and last name. A user with neither shows as Empty User. |
| Sign-in and Email | The line under the name: the username the person signs in with and, when one is set, their Email, separated by a dot. |
| Active / Inactive pill | Green Active when the person can sign in; red Inactive when the user has been deactivated. |
| Permission pill | The permission level: Administrator, User, PortalUser or FieldUser. |
| Save | Saves the form fields listed above. Beside it a short note shows Saving..., then Saved, or Not saved when the save failed. When a save fails, a message says why and what you typed stays on screen, so you can correct it and click Save again. |
| Changes | Opens the history of changes made to this user: who changed what, and when. |
| Deactivate / Activate | See Deactivate or activate a user below. |
| Refresh | Reloads the user from the server. Anything not yet saved is replaced by what is stored. |
If someone else changes this user while you have the screen open, the changed values appear on your screen straight away.
When someone leaves, deactivate their user instead of deleting it: their history, such as receipts, picks and counts, stays linked to their name, and they can no longer sign in.
To let the person sign in again, click Activate. It does not ask first, because it locks nobody out.
Rules:
The Account tab has three groups of fields on the left, Sign-in, Personal and Where they start, and a side panel on the right with the photo and, for an administrator, a summary.
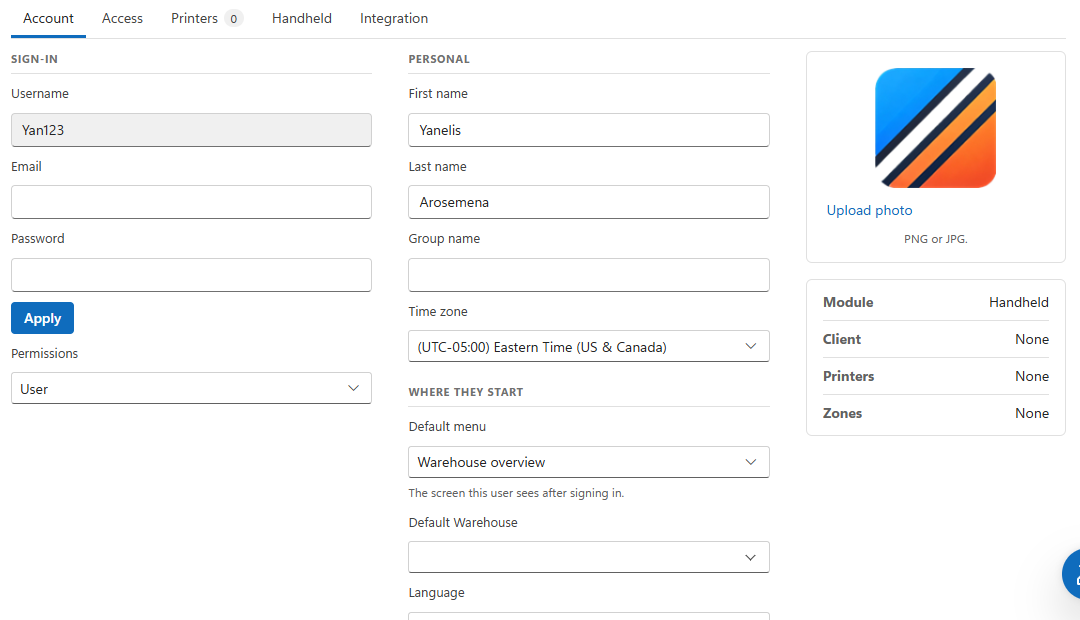
The Account tab: Sign-in, Personal and Where they start, with the photo panel and the Module, Client, Printers and Zones summary on the right.
| Field | What it does |
| Username | The name the person signs in with. It is shown but cannot be changed once the user exists. To use a different username, create a new user. |
| Where password resets and LogisticaHQ notifications for this person are sent. Saved with Save. | |
| Password | Shown in one of the forms described below. A password is never shown, only set. |
| Permissions | The permission level: Administrator, User, PortalUser or FieldUser. Shown to administrators only. Saved with Save. You cannot take away your own administrator level: the save is refused with Cannot demote self to non Administrator. |
What the Password row looks like depends on whose user it is and on your company's password policy:
| Field | What it does |
| First name, Last name | The person's name as shown throughout the System and in the header. Saved with Save. |
| Group name | A label that groups users, for example a shift or a team. It appears in the user list, where you can filter by it. Saved with Save. |
| Time zone | The person's own time zone. Dates and times they see are shown in it. Type in the list to search it. Saved with Save. |
| Field | What it does |
| Default menu | The screen this user sees after signing in. Administrators only. Choose one of:
|
| Default Warehouse | The Warehouse the person works in by default. Administrators only. Type to search by Warehouse code. Saved with Save. |
| Language | The language the person works in, on the web and on the Handheld. <Inherit> uses the company language, and follows it if it changes. Saved with Save. |
The Access tab decides what the person sees and where they may work. Administrators only.
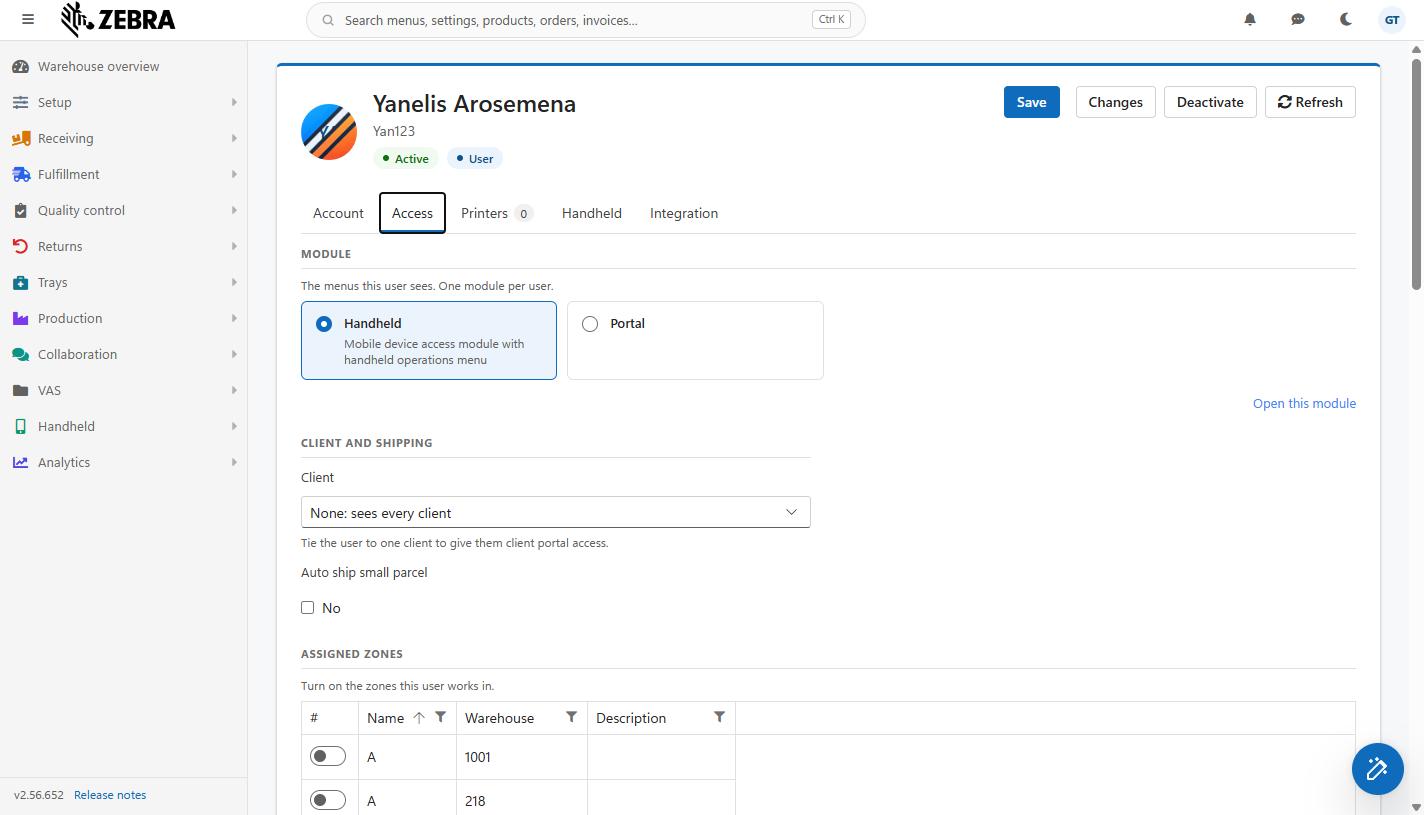
The Access tab: the module cards with Handheld selected, Client and shipping, and the Assigned Zones list.
The menus this user sees. One module per user. Each module set up in your company shows as a card with its name and description. The user's module is the highlighted card.
| Field | What it does |
| Client | Tie the user to one client to give them client portal access. Leave it on None: sees every client for Warehouse staff, who work for all Clients. Pick a client to make this a client user: they then see and handle only that client's Products, orders and stock. The choice is saved at once. Only a User or a PortalUser can have a client: for an Administrator the change is refused with a message that suggests changing the user type to Portal user. If the change is refused, the list goes back to the client the user still has. |
| Auto ship Small Parcel | When Yes, small-parcel orders this person finishes packing are shipped automatically, without a separate ship step. Saved with Save. |
Shown only when the user has a client. It lists the capabilities this client user has in the self-service client portal. Each is a switch, saved at once:
| Capability | Lets the client user |
| View dashboard | See the portal's dashboard. |
| View inventory | See their stock. |
| View orders & shipments | See their orders and shipments. |
| Place outbound orders | Create outbound orders. |
| View Purchase orders | See their Purchase orders. |
| Create Purchase orders | Create Purchase orders. |
| View Invoices | See their Invoices. |
| View reports | Run reports. |
| View Products | See their Products. |
| Manage Products | Create and change Products. |
| View Customers | See their Customers. |
| Manage Customers | Create and change Customers. |
| View Vendors | See their Vendors. |
| Manage Vendors | Create and change Vendors. |
See Clients for the client portal.
Turn on the Zones this user works in. The list shows every zone with its switch (#), Name, Warehouse and Description, sorted by name, 50 to a page. Each switch is saved at once.
A person with Zones assigned can move, pick and count stock only in those Zones, and is refused anywhere else with a message naming the zone. A person with no Zones assigned can work in every zone. See Zones.
Turn on the Printers this user may print to. The default is used when nothing else picks one. The tab's label shows how many Printers the user is allowed to use. Administrators only.
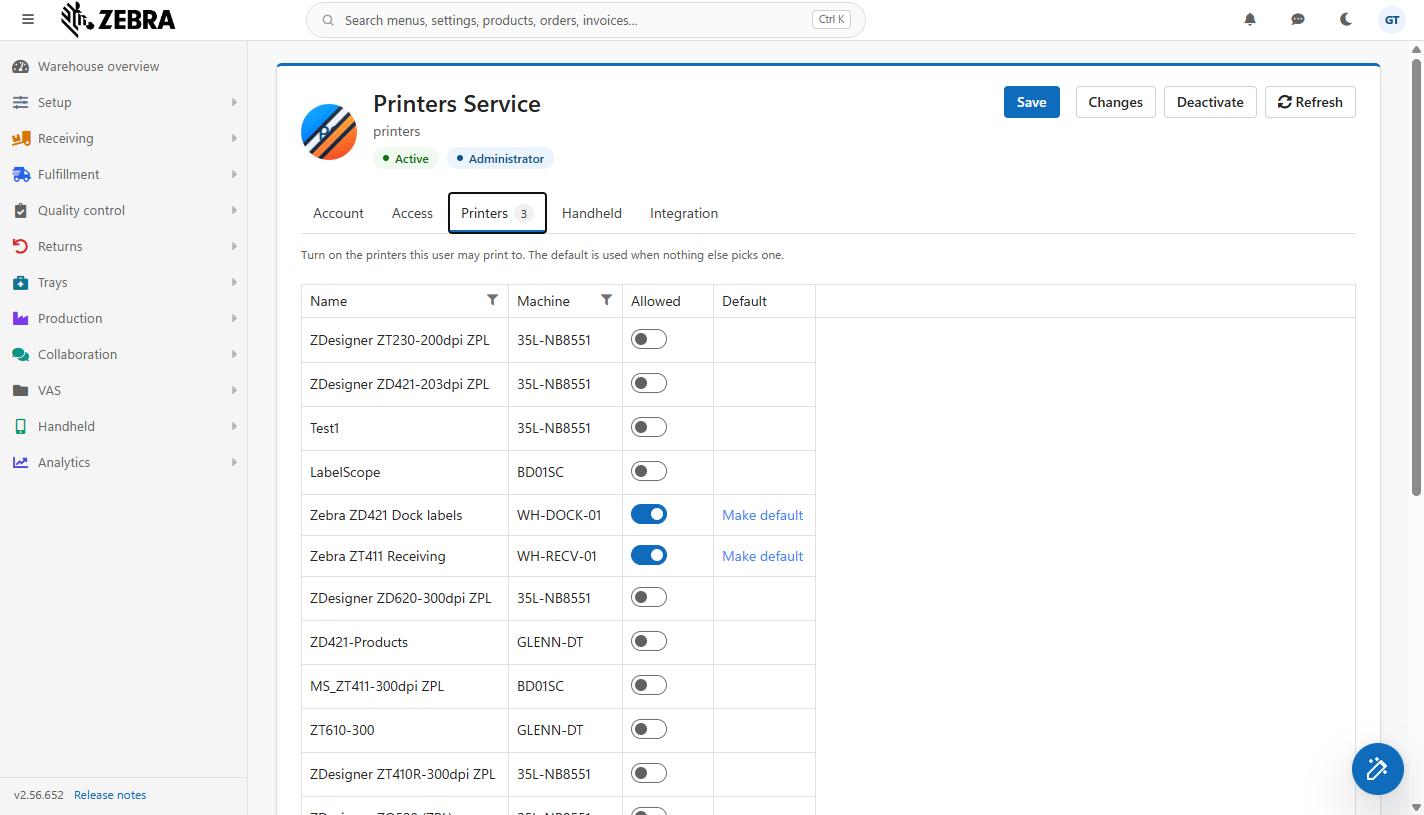
The Printers tab: each printer with its Machine and Allowed switch, and Make default next to the allowed ones.
| Column | What it shows or does |
| Name | The printer's name. |
| Machine | The computer whose Print agent reported the printer. Printers in different buildings often have the same name; the machine tells them apart. |
| Allowed | Switch on the Printers this person prints to. Saved at once. A printer that has been hidden is not offered, unless the user already has it, so it can still be switched off. |
| Default | Shown only for allowed Printers. Click Make default to make that printer the one used when nothing more specific applies. A user has one default: making a printer the default clears the previous one. The default printer shows a Default pill; click the pill (Clear the default) to leave the user with no default. |
Click Printer by document (advanced) below the list to decide which allowed printer prints which kind of label or document, such as bin labels, carrier labels or bills of lading.
When the user has no allowed Printers, the dialog shows No records and Submit is greyed out: allow Printers first. If the save is refused, the dialog stays open with your ticks and shows why in a red box.
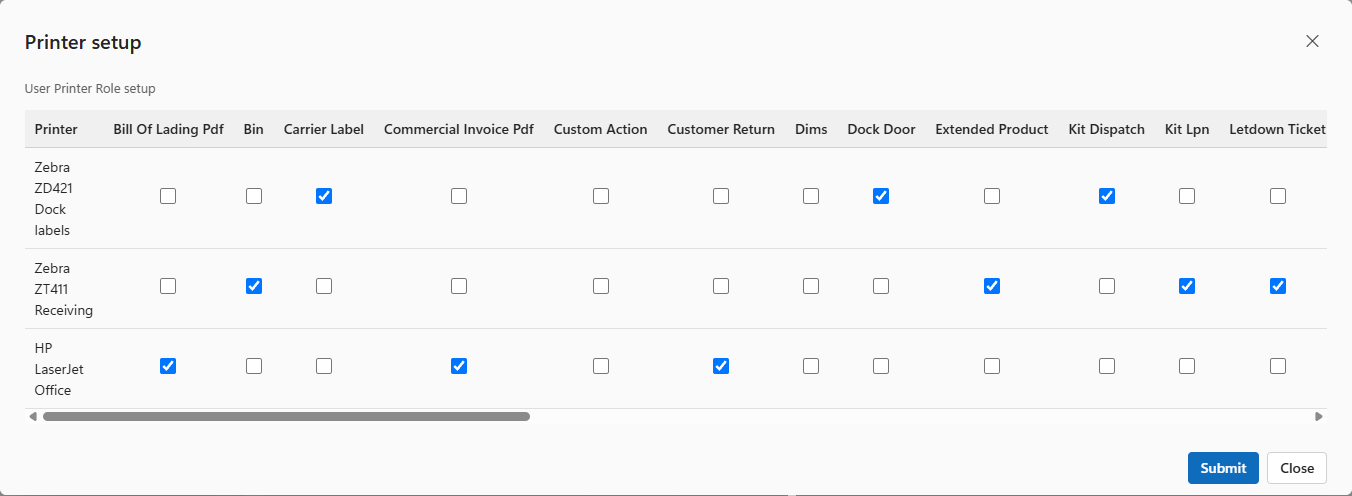
The Printer Setup dialog: each allowed printer with the document kinds it prints ticked.
The Packslip Pdf, Bill Of Lading Pdf and Master Bill Of Lading Pdf columns also decide where packing slips and BOLs that print by themselves go when this person ships, ahead of the Warehouse's printer. Do not give these to people who ship in more than one building. See Automatic printing of pack slips and BOLs.
Settings for the person's Handheld. Administrators only. Saved with Save.
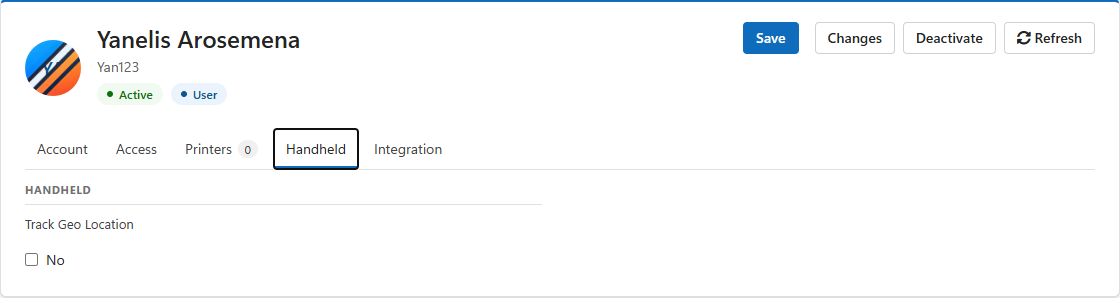
The Handheld tab for a user, with the Track Geo Location box.
| Field | What it does |
| Scan type | How this person's Handheld reads barcodes: Zebra Data Wedge (the built-in Zebra scanner), Camera (the device camera), or Line Feed (a scanner that sends the code as typed text, ending with a new line). Shown only when your company scans user by user, that is when the company's Handheld scan type setting in Setup > System > Configuration is set to UserSpecific. Otherwise everyone uses the company's scan type and the field is hidden. |
| Track Geo Location | When Yes, records where the person's Handheld is, for Delivery and field work. |
| Location - Last updated | Shown only when Track Geo Location is on and the Handheld has reported a position. The heading shows the date and time of the last report, and below it the Latitude and Longitude. These are read-only. |
Administrators only.
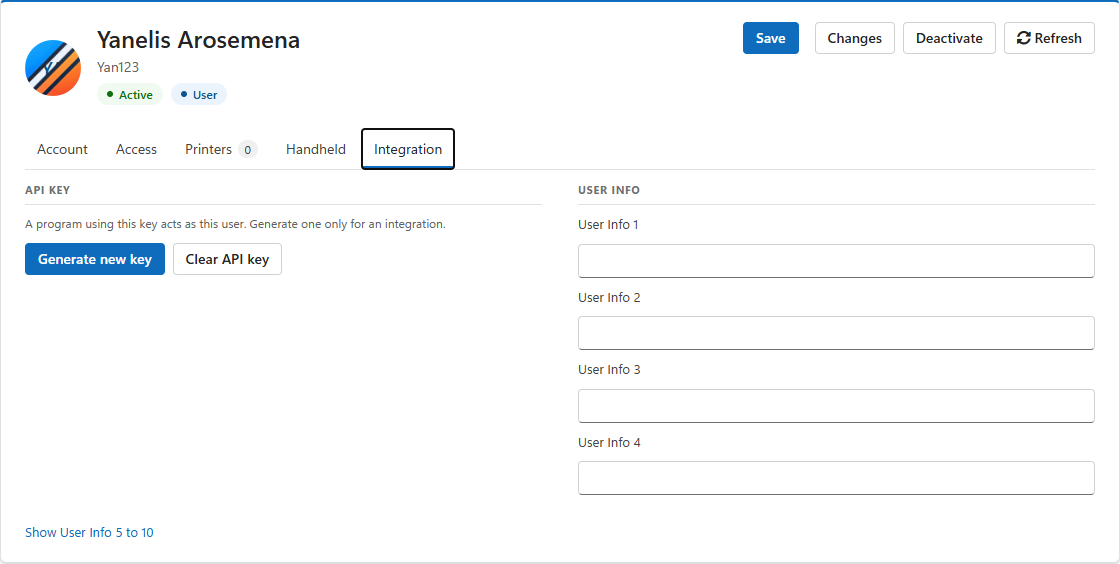
The Integration tab for a user with no API key yet: Generate new key and Clear API key, and User Info 1 to 4 with Show User Info 5 to 10.
A program using this key acts as this user. Generate one only for an integration, that is when another System connects to LogisticaHQ through the REST API. The program can do whatever this user's permissions allow. See REST API.
Keep the key private, like a password.
Free fields, User Info 1 to User Info 10, for anything your company wants to record about a user, such as an employee number. Saved with Save.
User Info 1 to 4 are shown. Click Show User Info 5 to 10 to show the rest. When any of User Info 5 to 10 already holds something, all ten are shown straight away, so nothing is ever hidden.
Everyone can open their own user, from Profile in the user menu, opened by clicking their name in the top bar. A person who is not an administrator sees:
[SCREENSHOT 8: A non-administrator's own profile: the header and the Account fields, with no tab strip and no summary panel.]
A non-administrator cannot change anyone else's user: a save is refused with Only Administrator can change other users, and a change of permission level with Permissions can only be changed by Administrator.
| Symptom | Likely cause | What to do |
| A change to a name, Email or time zone is gone after leaving the screen. | It was not saved: form fields save only with Save, and leaving does not warn. | Type it again and click Save. Wait for Saved. |
| The header shows Not saved. | The save was refused; the message said why. | Correct the field and click Save again. Your typing is still on screen. |
| There is no password box on someone else's user, only Send password reset Email. | The company does not allow administrators to change passwords directly. | Use the reset Email, or ask whoever manages the Configuration to allow direct changes. |
| Administrator cannot be deactivated, demote to User first. | The user is an administrator. | Set Permissions to User, click Save, then Deactivate. |
| A client cannot be picked for a user. | The user is an Administrator or FieldUser. | Set Permissions to PortalUser (or User), click Save, then pick the client. |
| Portal access is not shown. | The user has no client. | Pick a client under Client and shipping. |
| Scan type is not shown on the Handheld tab. | The company uses one scan type for everyone. | Expected. Change the company's Handheld scan type to UserSpecific only if people need different scan types. |
| Printer by document shows No records. | No printer is allowed for the user. | Switch on Printers under Allowed first. |
| The Default menu shows an address instead of a screen name. | The user has an older start screen typed by hand. | It still works. Pick one of the four entries and click Save to replace it. |
Was this page helpful?